

스마트 계약과 상호 작용하고 자체 스마트 계약을 배포하고 계약 주소를 사용하여 상호 작용하는 고급 전자 투표 dApp을 구축합니다. 이 dApp을 개발하기 위해 우리는 Trufflesuite 프레임워크를 계속 사용할 것입니다.
참고로 Trufflesuite 는 EVM 호환 블록체인에서 분산 애플리케이션(dApp)을 시작하기 위한 툴킷입니다. Truffle을 사용하면 스마트 계약을 작성 및 Compile하고 Migration을 실행하여 계약을 배포하고 배포된 계약과 상호 작용할 수 있습니다. 이 포스팅은 EVM(Ethereum Virtual Machine)의 Ganache와 MetaMask와 함께 Truffle을 사용하는 방법을 썼씁니다.
요구 사항
- NodeJS v8.9.4 이상.
- 함께 설치할 수 있는 트러플npm install -g truffle
- metamask.io 에서 설치할 수 있는 브라우저에 메타마스크 확장이 추가되었습니다 .
- DataHub 계정과 Avalanche API 키 가 있어야 합니다 .
- express, dotenv및 @truffle/hdwallet-provider(설치 지침은 아래에 있음).
프로젝트 설정
mkdir VotingDapp cd VotingDapp다음을 사용하여 폴더를 초기화합니다 npm.
npm init -y이제 npm다른 라이브러리를 설치 합니다.
npm install express --save마지막으로 다음을 사용하여 상용구 Truffle 프로젝트를 만듭니다.
truffle init이것은 초기 프로젝트 구조를 설정합니다.
스마트 계약은 contracts폴더에 저장되고,
스마트 계약을 네트워크로 마이그레이션하기 위한 배포 기능은 migrations폴더에 저장됩니다.
그리고 build/contracts폴더에는 배포된 계약, ABI 등에 대한 정보가 포함됩니다.
스마트 계약은 contracts폴더에 저장되고,
스마트 계약을 네트워크로 마이그레이션하기 위한 배포 기능은 migrations폴더에 저장됩니다.
그리고 build/contracts폴더에는 배포된 계약, ABI 등에 대한 정보가 포함됩니다.
truffle-config.js 업데이트
truffle init을 실행했을 때 생성된 파일 중 하나는 truffle-config.js. 입니다 해당 파일의 내용을 다음 코드로 바꿉니다.
module.exports = {
  networks: {
    development: {
      host: "127.0.0.1",
      port: 7545,
      network_id: "*"
    },
  },
  solc: {
    optimizer: {
      enabled: true,
      runs: 200
    }
  }
}
Election.sol 추가
contracts디렉터리에 Election.sol라는 새 파일을 추가하고 다음 코드 블록을 추가합니다.
pragma solidity >=0.4.21 <0.6.0;
pragma experimental ABIEncoderV2;

contract Election {
  //Election details will be stored in these variables
  string public name;
  string public description;

  //Structure of candidate standing in the election
  struct Candidate {
    uint id;
    string name;
    uint voteCount;
  }

  //Storing candidates in a map
  mapping(uint => Candidate) public candidates;

  //Storing address of those voters who already voted
  mapping(address => bool) public voters;

  //Number of candidates in standing in the election
  uint public candidatesCount = 0;

  //Setting of variables and data, during the creation of election contract
  constructor (string[] memory _nda, string[] memory _candidates) public {
    require(_candidates.length > 0, "There should be atleast 1 candidate.");
    name = _nda[0];
    description = _nda[1];
    for(uint i = 0; i < _candidates.length; i++) {
      addCandidate(_candidates[i]);
    }
  }

  //Private function to add a candidate
  function addCandidate (string memory _name) private {
    candidates[candidatesCount] = Candidate(candidatesCount, _name, 0);
    candidatesCount ++;
  }

  //Public vote function for voting a candidate
  function vote (uint _candidate) public {
    require(!voters[msg.sender], "Voter has already Voted!");
    require(_candidate < candidatesCount && _candidate >= 0, "Invalid candidate to Vote!");
    voters[msg.sender] = true;
    candidates[_candidate].voteCount++;
  }
}Election 스마트 컨트랙트는 우리가 투표하는 후보자에 대한 이름, 설명을 볼 수 있게 해줍니다.
이 DApp에서 우리는 address및 ABI. 이 스마트 계약은 새로운 선거를 생성할 때마다 블록체인에 배포됩니다.
MainContract.sol 추가
contracts디렉터리에 MainContract.sol라는 새 파일을 추가하고 다음 코드 블록을 추가합니다.
pragma solidity >=0.4.21 <0.6.0;
pragma experimental ABIEncoderV2;

import './Election.sol';

contract MainContract {
    uint public electionId = 0;
    mapping (uint => address) public Elections;

    function createElection (string[] memory _nda, string[] memory _candidates) public {
        Election election = new Election(_nda, _candidates);
        Elections[electionId] = address(election);
        electionId++;
    }
}
투표 DApp의 주요 진입점입니다. 배포된 계약의 수와 네트워크의 주소를 유지하고 배포하는 데도 도움이 됩니다.
새 마이그레이션 추가
migrations이라는 디렉토리에 새 파일 2_deploy_contracts.js을만들고 다음 코드 블록을 추가합니다.
이것은 블록체인에 대한 스마트 계약 배포를 처리합니다.
const MainContract = artifacts.require("MainContract");
const Election = artifacts.require("Election");

module.exports = function(deployer) {
    deployer.deploy(MainContract);
};
Truffle로 계약 컴파일
.sol 파일을 변경할 때마다 를 실행해야 합니다.
truffle compile
Compiling your contracts...
===========================
> Compiling ./contracts/Election.sol
> Compiling ./contracts/MainContract.sol
> Compiling ./contracts/Migrations.sol
> Artifacts written to /Desktop/VotingDapp/build/contracts
> Compiled successfully using:
- solc: 0.5.16+commit.9c3226ce.Emscripten.clang
블록체인과 상호작용하기 위한 UI 구축
- 블록체인과 상호 작용하기 위해 모든 파일을 보관할 src디렉토리를 만드십시오 .
- 다음을 사용하여 디렉토리 로 이동 cd src
- 새 파일을 만드십시오 server.js. 파일 안에 다음 코드를 넣습니다.
var express = require('express');
var app = express();

//JSON file for deployed contract and network information
const mainContractJSON = require('../build/contracts/MainContract.json')
const electionJSON = require('../build/contracts/Election.json')

require("dotenv").config();

app.use(express.static("./"));

app.get('/', (req, res) => {
    res.sendFile('index.html');
});

//Sending MainContract JSON file for its interaction using Truffle
app.get('/mainContractJSON', (req, res) => {
    res.send(mainContractJSON);
});

//Sending ABI object directly for Election contract, since only ABI will be used
app.get('/electionJSON', (req, res) => {
    res.send(electionJSON.abi);
});

app.listen(process.env.PORT || 3000, () => {
    console.log('Server started at 3000');
});
- 이제 새 파일 index.html을 만들고 파일 안에 다음 코드를 넣습니다.
- 이해를 돕기 위해 모든 것이 영어로 잘 설명되어 있습니다.
<!DOCTYPE html>

<html lang="en">
  <head>
    <title>Election</title>
  </head>

  <link href="https://stackpath.bootstrapcdn.com/bootstrap/4.4.1/css/bootstrap.min.css" rel="stylesheet">
  <link href="/index.css" rel="stylesheet">

  <body>
    <!-- This component will be used to create a new election -->
    <center id="newElectionButton">
      <div onclick="toggleNewElectionForm()">
        <img src="https://img.icons8.com/color/48/000000/plus-math.png"/><br>

        <font size = 2>
          <b>New Election</b>
        </font>
      </div>
    </center>

    <!-- This component contains form to create election -->
    <div id="newElectionForm" class="card">
      <!-- Cross image to hide form -->
      <span>
        <img onclick="toggleNewElectionForm()" src="https://img.icons8.com/emoji/48/000000/cross-mark-emoji.png"/>
      </span>

      <!-- This form will take details of new election and submit a transaction to the network -->
      <form id="formData" onsubmit="submitNewElection(); return false;">
        <font size = 2><b>Election title</b></font><br>
        <input name="details[]" placeholder="Name your election" required><br><br>

        <font size = 2><b>Election description</b></font><br>
        <input name="details[]" placeholder="Describe something about this election" required style="width: 80%;"><br><br>

        <div>
          <span>
            <font size = 2><b>1st Candidate name</b></font><br>
            <input name="candidates[]" placeholder="Candidate name" required>
          </span>

          <span>
            <font size = 2><b>2nd Candidate name</b></font><br>
            <input name="candidates[]" placeholder="Candidate name" required>
          </span>
        </div>

        <br><br>

        <input type="submit" class="btn btn-primary">
      </form>
    </div>

    <!-- List of elections on the network will appear here -->
    <div id="electionContainer" class="card">
      <!-- Account address will be rendered here -->
      <center id="account"></center>

      <!-- Loading will appear until blockchain data is loaded -->
      <center id='loader'>
        <span class="spinner-border text-primary"></span>
      </center>

      <!-- Button to synchronize the list of elections on the network -->
      <span>
        <img onclick="ElectionData.get()" src="https://img.icons8.com/color/50/000000/synchronize.png"/>
      </span>

      <br><br>

      <!-- Election data will appear here -->
      <div id="elections" class="container">
        <table class="table table-bordered">
          <tr>
            <td><b>ID</b></td>
            <td><b>Name</b></td>
            <td><b>Description</b></td>
            <td><b>Vote</b></td>
          </tr>

          <tbody id="electionDetails">

          </tbody>
        </table>
      </div>
    </div>
  </body>

  <!--jQuery CDN-->
  <script src="https://ajax.googleapis.com/ajax/libs/jquery/1.12.4/jquery.min.js"></script>

  <!--web3 module for interacting with blockchain-->
  <script language="javascript" type="text/javascript" src="https://cdn.jsdelivr.net/gh/ethereum/web3.js@1.0.0-beta.34/dist/web3.js"></script>

  <!--Truffle Contract module for interacting with smart contract in javascript-->
  <script src="https://rajranjan0608.github.io/ethereum-electionVoting/src/contract.js"></script>

  <!--Our custom javascript code for interaction-->
  <script type="module" language="javascript" src="/loadBlockchain.js"></script>
  <script type="module" language="javascript" src="/loadElections.js"></script>
  <script type="text/javascript" language="javascript" src="/index.js"></script>
</html>
- 기본 HTML 페이지에 디자인을 추가하려면 스타일시트파일도 필요합니다.
- 다음 코드로 index.css파일을 만듭니다 .
#newElectionButton {
    margin-top: 20px;
}

#newElectionButton > div {
    width: 100px;
    cursor: pointer;
}

img {
    width: 25px;
    height: 25px;
}

#formData {
    margin: 20px 20px;
}

#formData > input:nth-child(2) {
    width: 100%;
}

#formData > div {
    margin-bottom: 30px;
}

#formData > div > span {
    float: left;
}

#formData > div > span:nth-child(2) {
    margin-left: 30px;
}

#newElectionForm {
    width: 40%;
    margin: 50px auto;
    display: none;
}

#newElectionForm > span {
    position: absolute;
    top: 10px;
    right: 10px;
}

#newElectionForm > span > img {
    cursor: pointer;
}

#account {
    margin-top: 20px
}

#loader {
    margin-top: -8px;
}

#elections {
    margin-top: 15px;
}

#electionContainer {
    width: 80%;
    margin: 50px auto
}

#electionContainer > span {
    position: absolute;
    top: 10px;
    right: 10px;
}

#electionContainer > span > img {
    cursor: pointer;
}- index.js 라는 파일을 만들고 다음 코드를 추가합니다.
var isFormVisible = false;

function toggleNewElectionForm() {
  if(isFormVisible) {
    $('#newElectionButton').show();
    $('#newElectionForm').hide();
    isFormVisible = false;
  } else {
    $('#newElectionButton').hide();
    $('#newElectionForm').show();
    isFormVisible = true;
  }
}

async function submitNewElection() {
  var details = document.getElementsByName('details[]');
  var candidates = document.getElementsByName('candidates[]');
  toggleNewElectionForm();
  try {
    await ElectionData.createElection([details[0].value, details[1].value], [candidates[0].value, candidates[1].value]);
    document.getElementById('formData').reset();
  } catch(e) {
    document.getElementById('formData').reset();
  }
}
- 우리는 ABI를 사용하여 스마트 계약과 상호 작용할 것입니다.
- 상호 작용을 위해 loadBlockchain.js, Election.js및 loadElection.js. 각 파일의 사용법은 아래 이미지를 참고해주세요.
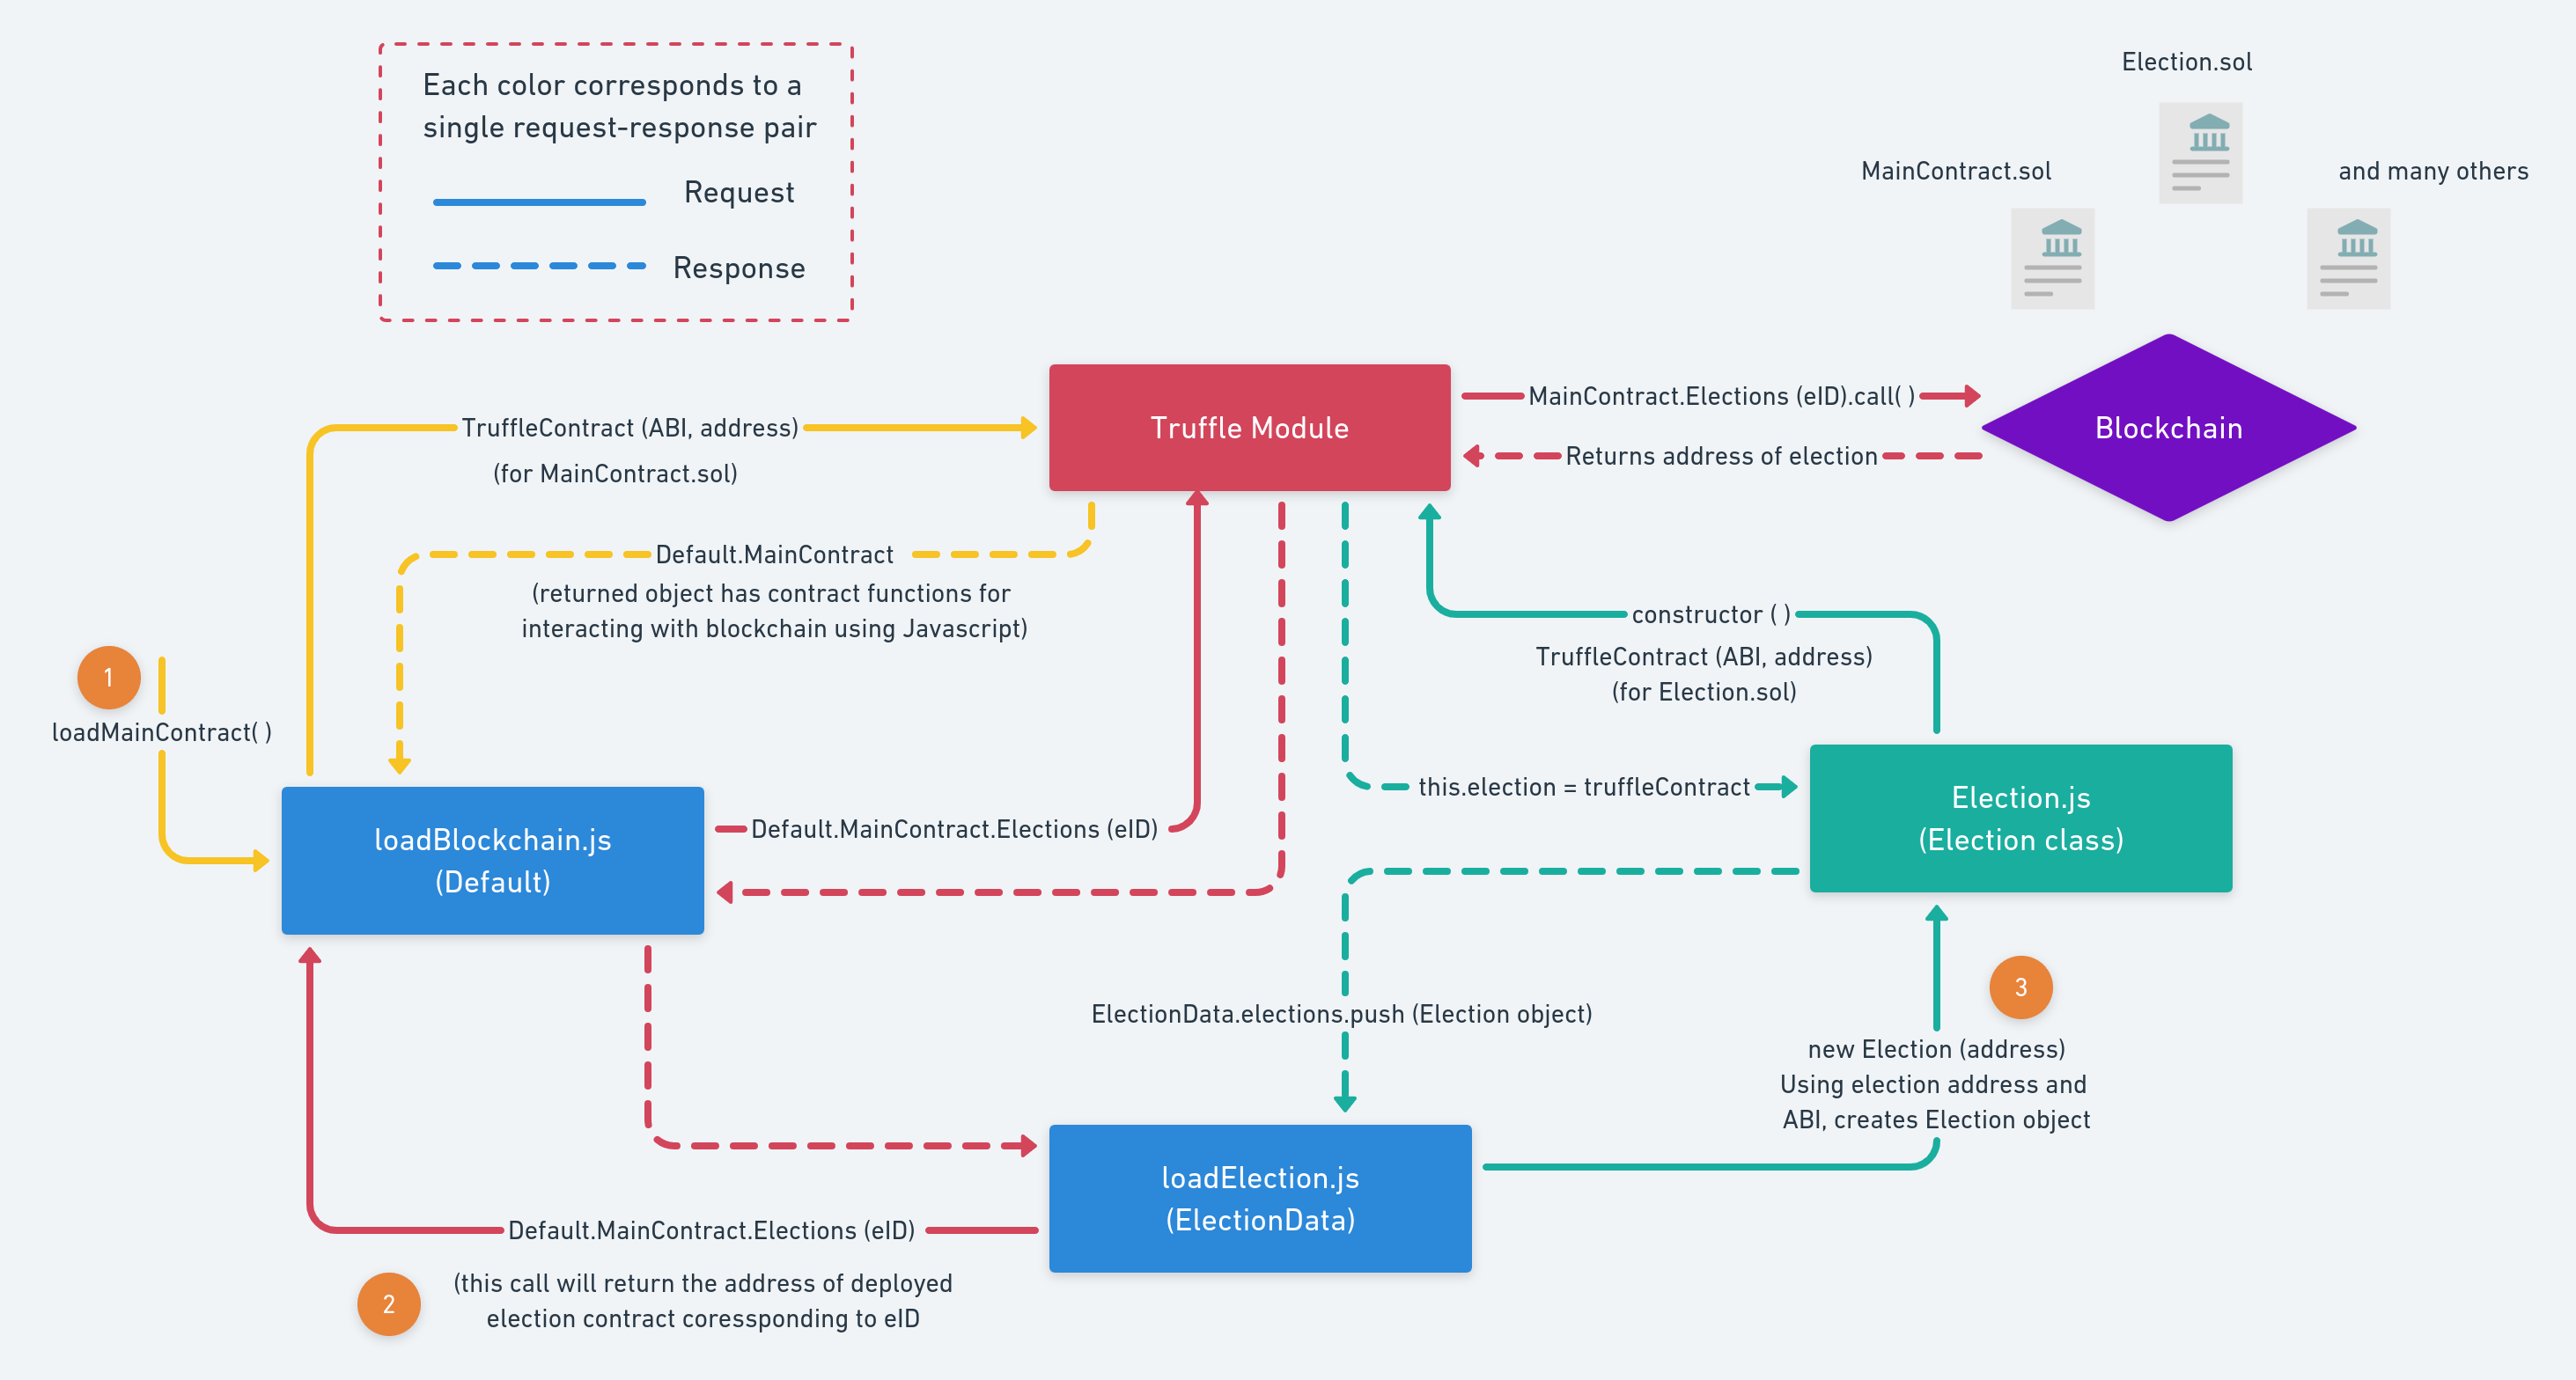
- loadBlockchain.js(기본값) - 이제 src디렉터리에 loadBlockchain.js파일을 만들고 다음 코드를 추가합니다.
-
import {ElectionData} from './loadElections.js'; // Default would contain all the necessary functions for interaction export var Default = { loading: false, contracts: {}, // Main function to be called first load: async () => { await Default.loadWeb3(); await Default.loadAccount(); await Default.loadMainContract(); await ElectionData.get(); await Default.render(); }, // Loading web3 on the browser loadWeb3: async () => { if(typeof web3 !== 'undefined') { web3 = new Web3(web3.currentProvider); Default.web3Provider = web3.currentProvider; } else { window.alert("Please connect to Metamask"); } if(window.ethereum) { window.web3 = new Web3(ethereum); try { await ethereum.enable(); }catch (error) { console.log(error); } }else if(window.web3) { Default.web3Provider = web3.currentProvider; window.web3 = new Web3(web3.currentProvider); }else{ console.log('Non-Ethereum Browser detected'); } }, // This function would load account from Metamask to our dDefault loadAccount: async() => { await web3.eth.getAccounts().then((result)=>{ Default.account = result[0]; }); }, // This function would help in loading contract to Default.MainContract loadMainContract: async () => { // Static pre-deployed contracts should be handled like this const MainContract = await $.getJSON('/mainContractJSON'); Default.contracts.MainContract = TruffleContract(MainContract); Default.contracts.MainContract.setProvider(Default.web3Provider); Default.MainContract = await Default.contracts.MainContract.deployed(); }, // This function will be called after the browser is ready for blockchain interaction render: async() => { if(Default.loading) { return; } Default.setLoading(true); $('#account').html(Default.account); Default.setLoading(false); }, // This will facilitate loading feature according to the blockchain data setLoading: (boolean) => { Default.loading = boolean; const loader = $('#loader'); const content = $('#content'); if(boolean) { loader.show(); content.hide(); }else { loader.hide(); content.show(); } } }; // Function to initiate the blockchain interaction $(() => { window.addEventListener('load', ()=>{ Default.load(); }); }); window.Default = Default; - Election.js(Election) - 이제 src디렉터리에 Election.js파일을 만들고 다음 코드를 추가합니다.
-
import {Default} from './loadBlockchain.js';
import {ElectionData} from './loadElections.js';

// Election class for maintaining separate states for each election contract
export class Election {
constructor(address) {
  this.address = address;
}

init = async () => {
  await this.loadElectionContract();
}

// Loading election contract's javascript equivalent in the this.election variable
loadElectionContract = async () => {
  // Dynamic contracts whose address is not known should be handled like this
  var electionABI = await $.getJSON('/electionJSON');
  this.election = await new web3.eth.Contract(electionABI, this.address);
  await this.election.setProvider(web3.currentProvider);
}

// Get details of the election
getDetails = async () => {
  var details = {};

  // Fetching details from blockchain and storing it in details object
  details.candidates      = [];
  details.address         = this.address;
  details.candidatesCount = await this.election.methods.candidatesCount().call()
  details.name            = await this.election.methods.name().call();
  details.description     = await this.election.methods.description().call();
  details.hasVoted        = await this.election.methods.voters(Default.account).call();

  // Fetching candidate details along with their vote count
  for(var i = 0; i < details.candidatesCount; i++) {
      var candidate = await this.election.methods.candidates(i).call()

      details.candidates.push({
          name: candidate.name,
          voteCount: candidate.voteCount
      });
  }

  return details;
}

// This function will call vote() on Fuji testnet
castVote = async (candidateId) => {
  await this.election.methods.vote(candidateId).send({ from: Default.account });
  await ElectionData.get();
}
}
-
loadElection.js(ElectionData) - 이제 src디렉터리 loadBlockchain.js에 파일을 만들고 다음 코드를 추가합니다.
import {Default} from './loadBlockchain.js';
import {Election} from './Election.js';

export var ElectionData = {
  // get() is a loader function, to run loadElections() function.
  get: async () => {
      await ElectionData.loadElections();
      await ElectionData.loadElectionDetails();
  },

  // Loading deployed election contracts in Default.election array
  loadElections: async () => {
      ElectionData.elections = [];
      ElectionData.electionCount = await Default.MainContract.electionId();
      for(var i = 0; i < ElectionData.electionCount; i++) {
          var electionAddress = await Default.MainContract.Elections(i);
          var election = await new Election(electionAddress);
          await election.init();
          ElectionData.elections.push(election);
      }

  },

  // This function will update the page with election details
  loadElectionDetails: async () => {
      $('#electionDetails').html("");
      for(var i = 0; i < ElectionData.electionCount; i++) {
          var details = await ElectionData.elections[i].getDetails();
          var votingForm;
          // Showing voting forms to only non-voted elections
          if(details.hasVoted) {
              votingForm = `<td>
                              <font size = 2 color = 'green'><b>Voted</b></font>
                            </td>`
          } else {
              votingForm = `<td>
                              <span>
                                <input type='radio' name=${details.address} id="${details.address}0" onclick="ElectionData.elections[${i}].castVote(0)">
                                <label for="${details.address}0"> ${details.candidates[0].name}</label>
                        </span> <br>
                              <span>
                                <input type='radio' name=${details.address} id="${details.address}1" onclick="ElectionData.elections[${i}].castVote(1)">
                                <label for="${details.address}1"> ${details.candidates[1].name}</label>
                        </span>
                            </td>`
          }
          var electionComponent = `<tr>
                                      <td>${i}</td>
                                      <td>${details.name}</td>
                                      <td>
                                          ${details.description}<br>
                                          <font size = 2 class='text-muted'>
                                              ${details.address}<br>
                                              <b>${details.candidates[0].name} (${details.candidates[0].voteCount})</b> vs
                                              <b>${details.candidates[1].name} (${details.candidates[1].voteCount})</b>
                                          </font>
                                      </td>
                                      ${votingForm}
                                  </tr>`
          $('#electionDetails').append(electionComponent);
      }
  },

  // Function to create (deploy) election on the network
  createElection: async (details, candidates) => {
      await Default.MainContract.createElection(details, candidates, {from: Default.account});
      ElectionData.get();
  }
}

window.ElectionData = ElectionData;
이제 src디렉토리에서 명령 node server.js을 실행하여 서버를 시작하십시오!
- dApp과 상호 작용하려면 http://localhost:3000 을 방문하세요 .
결론
축하합니다! Trufflesuite를 사용하여 완전한 dApp을 성공적으로 구축하고 로컬에서 스마트 계약을 배포했습니다.
이와 함께 네트워크와 상호 작용하기 위한 클라이언트 측 애플리케이션도 구축했습니다.
다음 포스팅
Truffle unbox react 라이브러리로 고급 투표 DApp 포스팅하겠습니다.
'Solidity' 카테고리의 다른 글
| 솔리디티 Truffle & React 서명방식 3가지 (0) | 2022.03.07 |
|---|---|
| 솔리디티 투표 DApp(고급) (0) | 2022.02.25 |
| 솔리디티 OpenZeppelin & Ropsten 테스트넷 배포 (0) | 2022.02.17 |
| 블록체인, 솔리디티 ERC-20 토큰 만들기 (직접 코딩해서) (0) | 2022.02.15 |
| 블록체인 ERC-20 토큰 만들기(이더리움 테스트넷) (0) | 2022.02.14 |